
Crumbs, dust, and sticky keys can make typing miserable and can even shorten your keyboard’s life. Clean it the right way and you will get smoother keys, a fresher workspace, and fewer germs without risking liquid damage.
Your keyboard collects dust, skin oils, and little food bits faster than most of us realize. The trick is cleaning thoroughly without pushing debris deeper or letting liquid seep under the keys. Use the steps below to match your keyboard type and the mess you are dealing with.
Before you start: identify your keyboard and your risk level
“Keyboard” can mean a laptop keyboard, a low-profile wireless keyboard, or a mechanical keyboard with removable keycaps. The safest approach depends on what you can remove and how easily liquid can reach electronics.
Quick comparison: best cleaning approach by keyboard type
| Keyboard type | Best routine clean | Best deep clean | What to avoid |
|---|---|---|---|
| Laptop keyboard (built-in) | Power off, invert and tap, brush, compressed air, light wipe | Spot-clean sticky keys with alcohol on a swab | Soaking, prying keys unless you know they are designed to come off |
| Standard membrane keyboard | Unplug, invert and tap, brush, compressed air, wipe | Limited keycap removal (if designed for it), otherwise careful surface clean | Flooding with cleaner, dishwasher “hacks” |
| Mechanical keyboard (removable keycaps) | Unplug, brush, compressed air, wipe keycaps | Remove keycaps, wash keycaps separately, clean plate and switches carefully | Spraying switches directly, soaking the keyboard body |
What you need (and what not to use)
You do not need a drawer full of tools. You do need the right ones so you are lifting dirt instead of smearing it around or dripping liquid where it does not belong.
Simple supply checklist
- Microfiber cloth (2 is ideal: one slightly damp, one dry)
- Isopropyl alcohol (70% for safer evaporation control, 90% for faster drying; use sparingly either way)
- Cotton swabs or foam swabs for tight gaps
- Soft brush (clean makeup brush, small paintbrush, or keyboard brush)
- Compressed air (optional but helpful for crumbs)
- Keycap puller (mechanical keyboards only)
- Mild dish soap and a bowl (for washing removable keycaps)
Avoid these common “shortcuts”
- Household glass cleaner that contains ammonia, it can damage coatings and leave residue.
- Bleach on plastics and painted legends, it can discolor.
- Spraying any liquid directly onto the keyboard, it is too easy to overdo it.
- Vinegar for general keyboard cleaning, it is not necessary and can be harsh on some finishes.
- Disinfecting wipes that are dripping wet, squeeze them out first if you use them at all.
Safety first: power down and prep your space
Most keyboard damage happens during the “just a quick wipe” stage. A little prep prevents the classic mistake of pushing liquid into the keys or shorting a powered device.
- Unplug a wired keyboard. For wireless, turn it off and remove batteries if practical.
- For laptops, shut down completely (not sleep) and unplug the charger.
- Put a towel or tray underneath to catch crumbs and keep your desk cleaner.
- If you plan to remove keycaps, take a quick photo of the layout first.
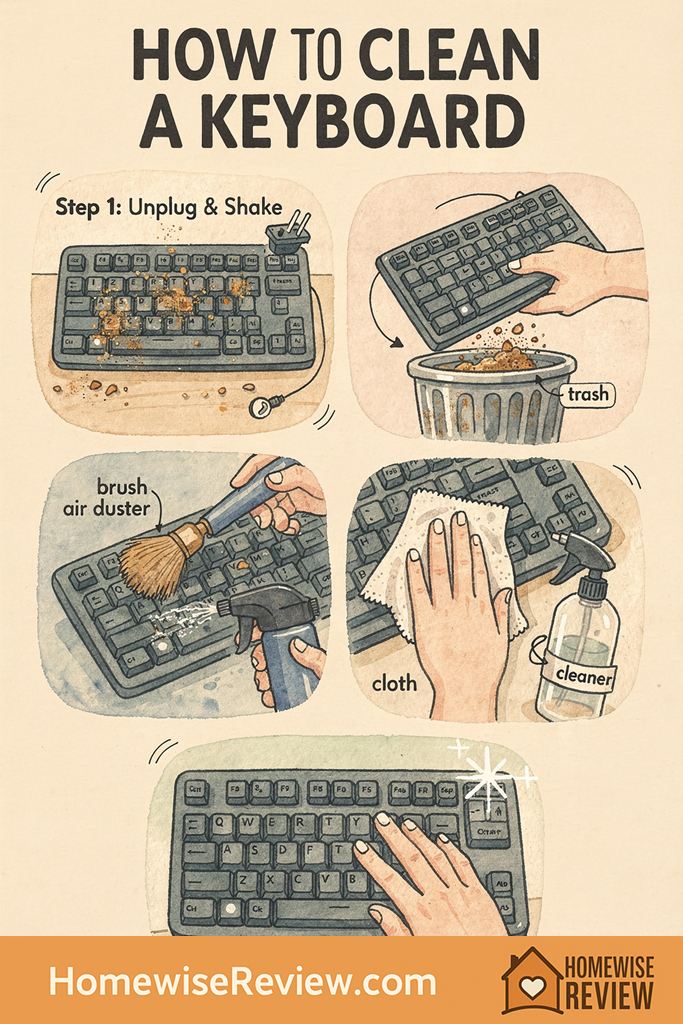
5-minute routine clean (the one that prevents gross buildup)
This is the best “maintenance clean” and it is usually all you need if you do it regularly. The goal is to remove loose debris first, then wipe away oils.
Step-by-step routine clean
- Invert and tap: Turn the keyboard upside down and gently tap the back. Do not slam it.
- Brush the gaps: Use a soft brush to loosen dust around keys while the keyboard is still inverted.
- Use compressed air (optional): Short bursts, angled sideways across the keys. Keep the can upright to avoid propellant spray.
- Wipe key tops: Lightly dampen a microfiber cloth with water or a 1:1 mix of water and isopropyl alcohol (do not soak). Wipe across rows.
- Detail edges: Use an alcohol-dampened swab around sticky spots and the outer frame.
- Dry buff: Finish with a dry microfiber cloth so no moisture lingers.
How often should you do this?
| Situation | Quick clean frequency | Deep clean frequency |
|---|---|---|
| Home office, no eating at desk | Every 2 to 4 weeks | Every 6 to 12 months |
| Shared family computer, light snacking happens | Weekly to every 2 weeks | Every 3 to 6 months |
| Kids use it often, visible crumbs or sticky keys | Weekly | Every 1 to 3 months (as needed) |
Deep clean for mechanical keyboards (remove and wash keycaps)
If your keyboard has removable keycaps, this is the most satisfying clean because you can get to the real debris. Plan for drying time so you are not tempted to reassemble damp parts.
1) Remove keycaps safely
- Unplug or power off.
- Use a keycap puller and pull straight up.
- For large keys (spacebar, enter, shift), pull gently and evenly. Stabilizers vary, so go slow.
- Keep keycaps grouped or use your photo to help with reassembly.
2) Clean the keyboard body (plate and between switches)
- Tip the board and tap out debris.
- Brush between switches, then use short compressed-air bursts.
- Wipe the surface with a microfiber cloth lightly dampened with isopropyl alcohol. Keep liquid away from switch openings.
- For stubborn grime on the plate, use an alcohol-dampened swab and work in small sections.
3) Wash keycaps (separately)
- Fill a bowl with warm water and a few drops of mild dish soap.
- Soak keycaps for 15 to 30 minutes, then gently rub with your fingers to release oils.
- Rinse thoroughly so no soap film remains.
- Spread keycaps on a towel in a single layer to dry.
Drying time that prevents damage
- Keycaps: let them air-dry for at least 12 hours, 24 hours is safest.
- Keyboard body: 10 to 20 minutes after alcohol wiping, longer if you used any water near the frame.
Deep clean for laptop keyboards (careful, targeted, and dry)
Laptop keyboards sit directly above sensitive components, so your main job is controlling moisture. You can still get a very clean result by focusing on dry debris removal first, then tiny amounts of alcohol for sticky spots.
Step-by-step laptop keyboard clean
- Power down completely and unplug.
- Hold the laptop at a slight angle and gently tap to dislodge crumbs.
- Brush between keys using a soft brush, working top to bottom.
- Use compressed air in short bursts at a low angle.
- Lightly wipe key tops with a microfiber cloth dampened with isopropyl alcohol (not dripping).
- Use a swab for the key edges and tight corners.
Should you remove laptop keys?
Usually, no. Many laptop key mechanisms are easy to break and harder to reinstall than people expect. Only remove keys if your laptop manual explicitly shows the method and you have a real reason, like a sticky key that will not free up with surface cleaning.
How to disinfect a keyboard (without wrecking the finish)
Disinfecting is different from cleaning. Clean first so oils and dirt do not block your disinfectant from doing its job.
Safer disinfecting method
- After your routine clean, lightly dampen a microfiber cloth with 70% isopropyl alcohol.
- Wipe key tops and frequently touched areas like the spacebar and enter key.
- Keep the cloth moving and avoid pooling liquid around key edges.
- Let it air-dry fully before powering back on.
When disinfecting is most worth it
- After someone in the house has been sick.
- Shared family devices and shared workstations.
- If you eat at your desk and notice oily buildup.
Sticky keys, oily shine, and mystery gunk: targeted fixes
The biggest complaints are usually stickiness, shine from skin oils, or a few keys that feel sluggish. Work in small sections so you do not over-wet anything.
Fix sticky keys (without flooding)
- Start with compressed air to blow out crumbs.
- Dampen a swab with isopropyl alcohol and clean around the key edges.
- Press the key repeatedly for 15 to 20 seconds to help the alcohol work into the edges, then stop and let it dry.
- If it is still sticky and you have a mechanical keyboard, remove that keycap and clean underneath.
Remove oily shine on key tops
- Use a microfiber cloth dampened with isopropyl alcohol.
- Wipe in straight passes across a row, then switch to a dry cloth.
- If the “shine” is actually worn plastic (common on older keyboards), cleaning will help, but it cannot restore the original texture.
What if you spilled something sugary?
Sticky drinks are the hardest because sugar dries like glue. If it is a laptop, shut it down immediately, turn it off, and let it dry upside down while you assess. For an external keyboard with removable keycaps, a deep clean is usually the most effective solution.
Common mistakes that cause damage (and what to do instead)
| Mistake | Why it is a problem | Do this instead |
|---|---|---|
| Spraying cleaner directly on keys | Liquid can seep under keycaps and reach circuits | Spray onto cloth first, or use alcohol-dampened swabs |
| Using a soaking wet wipe | Excess moisture pools at key edges | Wring out wipes and follow with a dry microfiber |
| Holding compressed air too close | Can force debris deeper or blow off small parts | Use short bursts at an angle from a few inches away |
| Rushing reassembly after washing keycaps | Traps moisture and can cause sticking or corrosion | Air-dry 12 to 24 hours before reinstalling |
Keep it clean longer: small habits that make a big difference
The easiest keyboard to clean is the one that never gets the chance to build up grime. A few simple habits can cut your cleaning time down to minutes.
- Keep snacks off the keyboard zone: even moving food to one side of the desk helps.
- Wash hands first if you have lotion, sunscreen, or cooking oils on your fingers.
- Do a weekly “flip and tap” if kids use the computer. Crumbs love the spacebar.
- Use a keyboard cover on laptops if you are in a dusty space or you eat at the desk often (remove it occasionally to clean underneath).
💡 Editor’s Final Thoughts
Clean keyboards last longer and feel better to use, but the safest results come from a dry-first approach and very controlled moisture. Start with inversion, brushing, and air to remove debris, then use a lightly damp microfiber and small swabs for sticky spots. If you have removable keycaps, a keycap wash plus careful drying is the most thorough refresh you can do at home.
See also
If you are trying to simplify your supply stash, start with best non-toxic cleaning products for families and then compare options in our Method all-purpose cleaner review for cleaning the desk area around your keyboard.
- How to remove grease from surfaces and tools
- Scrub Daddy sponges review (and where they actually help)
- Stain-rescue decision tree for quick cleaning decisions
Frequently Asked Questions ▾
Can I use water to clean my keyboard?
You can use a microfiber cloth that is lightly dampened with water for the key tops and outer frame, but avoid letting water run into the gaps. For sticky residue, isopropyl alcohol on a swab is usually safer because it evaporates faster.
Is it safe to use disinfecting wipes on a keyboard?
It can be, as long as the wipe is not dripping and you do not let liquid pool around key edges. Test a small corner first, wipe gently, then follow with a dry microfiber cloth.
How do I clean under keys if I cannot remove keycaps?
Flip and tap first, then brush while inverted, then use compressed air in short angled bursts. Finish with targeted swabs around the key edges to lift grime without forcing moisture underneath.
My keyboard is still sticky after cleaning. What now?
Sticky keys usually mean dried sugar or residue under the keycap. Repeat the compressed air and alcohol-swab method, letting it fully dry between rounds. If it is a mechanical keyboard, remove the keycap and clean underneath; if it is a laptop key, avoid prying unless your model is designed for safe removal.
How long should I wait before plugging it back in?
If you only used a lightly damp cloth with alcohol, 10 to 20 minutes is usually enough. If any water was used near the edges or you washed keycaps, wait until everything is completely dry, often 12 to 24 hours for keycaps.
As an Amazon Associate, we earn from qualifying purchases made through links on our site.